Mail Merge
Wordize supports mail merge operations to automate the creation of personalized documents in any format:
- to perform a mail merge operation, use the Wordize Mail Merge for .NET module
- to work with documents in the required formats, select the appropriate document conversion module
Wordize allows users to automate the creation of personalized documents such as letters, invoices, or emails. It works by combining a template with data from sources like spreadsheets or databases, which is called Mail Merge. This saves time, reduces errors, and allows for efficient batch document generation.
How Mail Merge Works
Mail Merge is a process that combines a document template with data to create personalized documents in bulk. It works by inserting specific fields (e.g., names, addresses) into a template, which is then filled with data from a data source, generating multiple customized outputs.
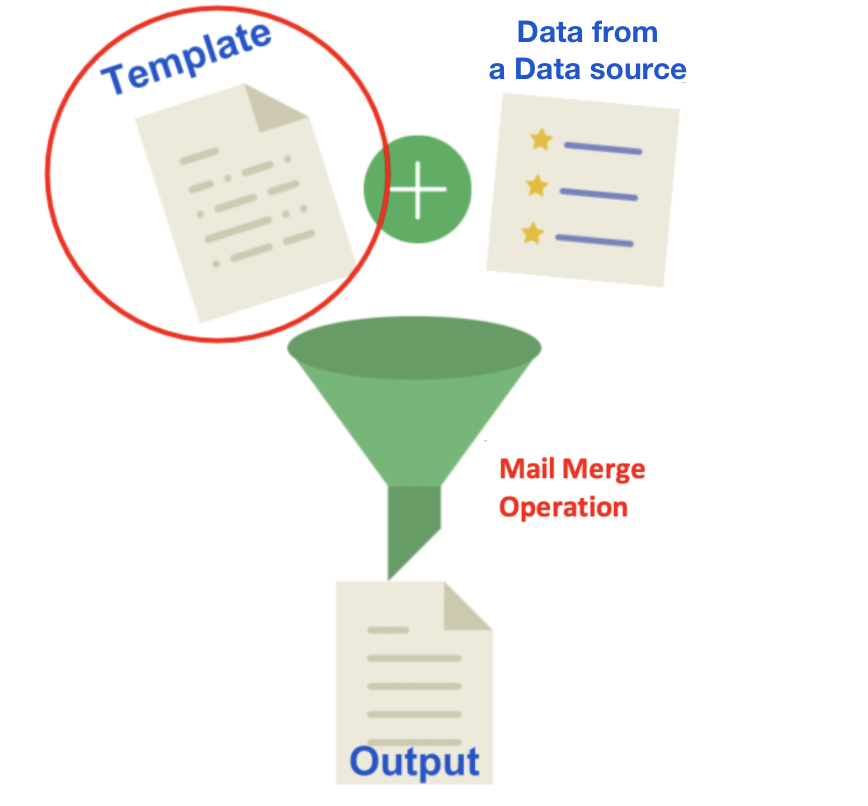
Wordize allows users to use DataRow, DataTable, DataSet, and an array of values as data sources.
Simple Mail Merge Operation
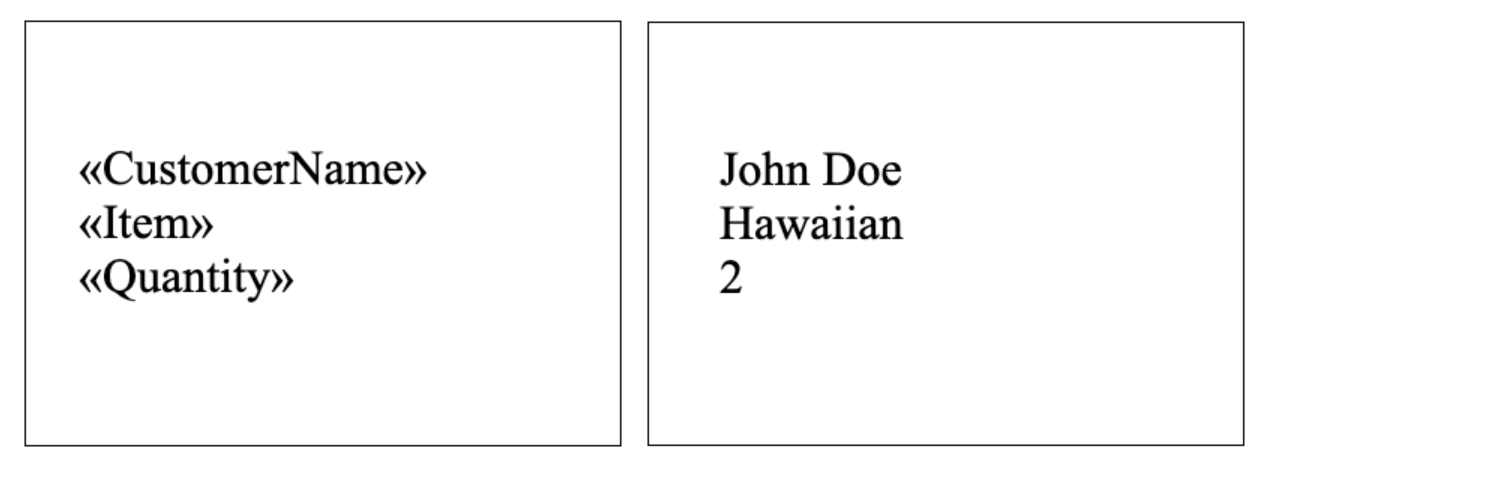
Simple Mail Merge creates personalized documents by merging a template with data. In the template, placeholders (called merge fields) represent dynamic content like names, addresses, or dates. During the merge process, these placeholders are replaced with the corresponding data from an external data source.
You can add one or more merge fields to your template and then run a simple mail merge operation. It is important to understand that the output documents will differ only in the specific values in the merge fields.
Follow these steps to execute a simple mail merge operation:
- Prepare a template document with merge fields (e.g.
<<FirstName>>,<<Location>>,<<Quantity>>) - Prepare data in the data source (DataRow, DataTable, DataSet, array of values)
- Execute the merge operation to produce individual documents with personalized information using one of the Execute methods
Look at the templates for performing the mail merge operation:
The following code example shows how to perform a simple merge operation using the Simple template and Execute method:
var doc = "MergeTemplate.docx";

string[] fieldNames = new string[] { "FirstName", "Location", "Quantity" };
string[] fieldValues = new string[] { "James Bond", "London", "7" };

MailMerger.Execute(doc, "MailMerge.1.docx", fieldNames, fieldValues);
Mail Merge with Regions
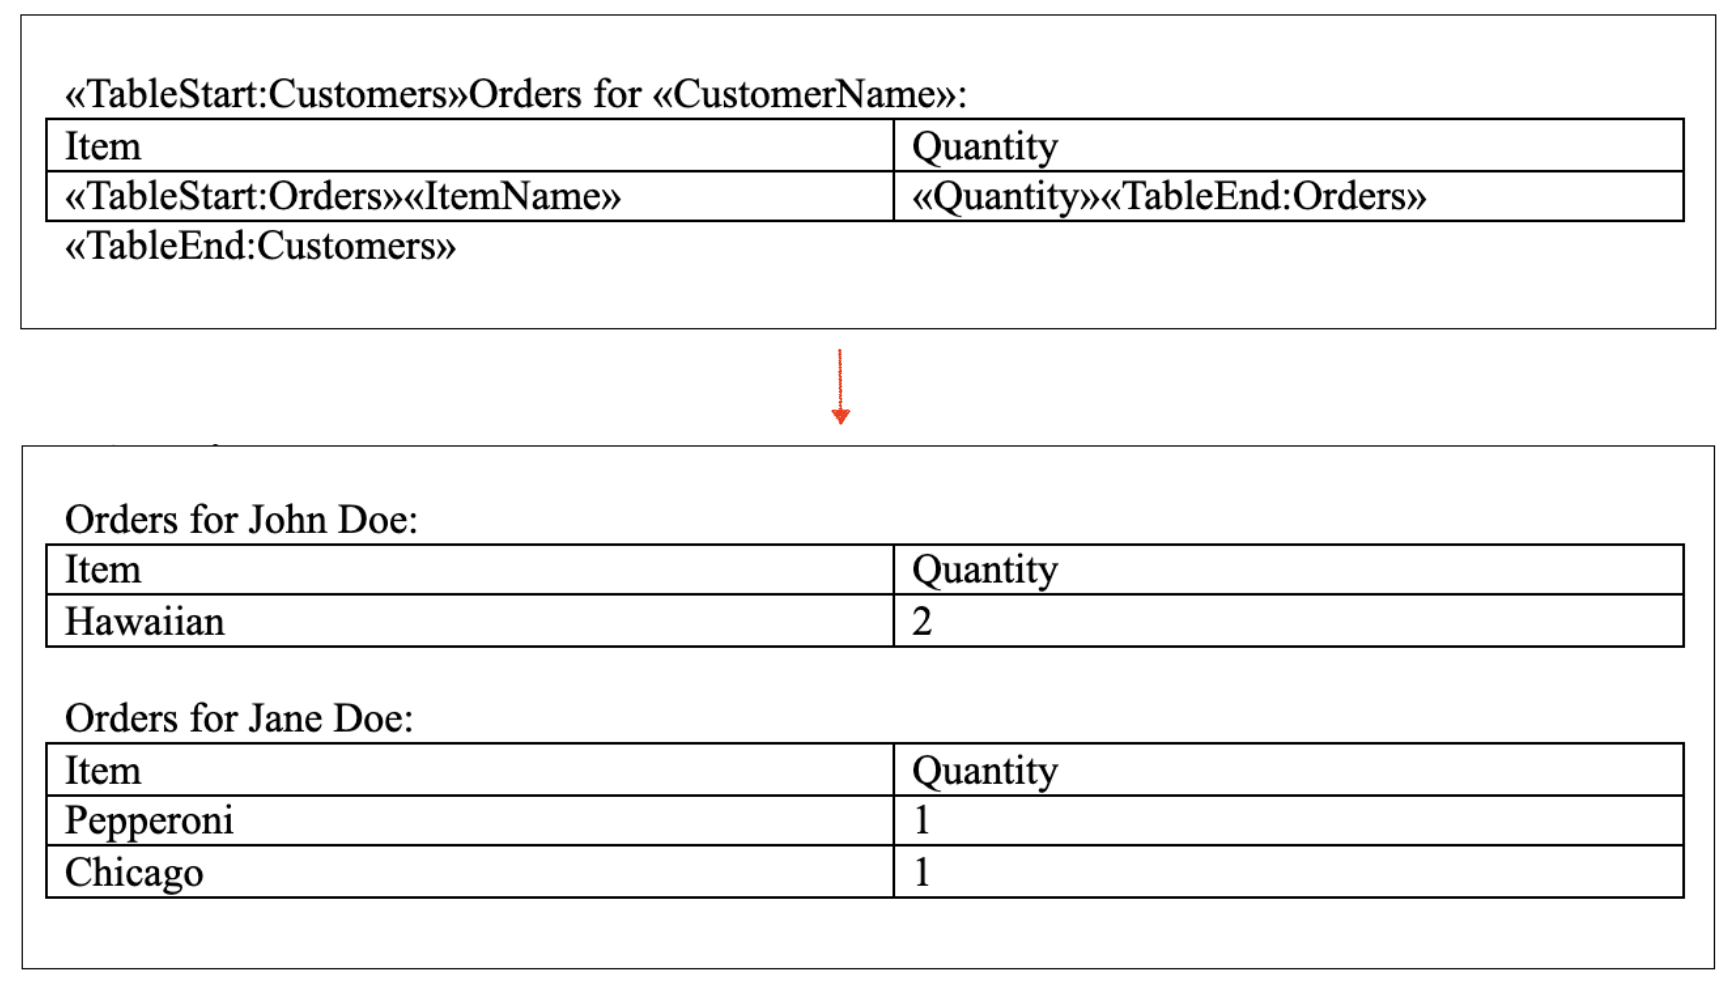
Mail merge with regions is used when you need to insert dynamic content (such as tables with different numbers of rows or itemized lists of different lengths) for a specific area of the document. In this case, merge regions are used instead of simple merge fields – they define sections that are repeated for each data record. This is useful for documents like invoices with multiple line items or reports with dynamic tables.
You can add one or more merge regions to your template and then perform a mail merge operation with the regions.
Follow these steps to execute a mail merge with regions:
- Define the merge region in the template using start and end markers (e.g.,
<<TableStart:Items>>and<<TableEnd:Items>>) - Connect the template to a structured data source with nested records
- Perform the merge operation using one of the ExecuteWithRegions methods
This advanced method provides greater flexibility to handle complex scenarios with multiple data records.
Look at the templates for performing the mail merge with regions operation:
The following code example shows how to perform a mail merge with regions operation using the Simple template (for code examples with a DataTable parameter) or the Data Set template template (for code examples with a DataSet parameter) and ExecuteWithRegions method:
var doc = "MergeRegionsTemplate.docx";

DataTable dataTable = new DataTable("MyTable");
dataTable.Columns.Add("FirstName");
dataTable.Columns.Add("LastName");
dataTable.Rows.Add(new object[] { "John", "Doe" });
dataTable.Rows.Add(new object[] { "", "" });
dataTable.Rows.Add(new object[] { "Jane", "Doe" });

MailMerger.ExecuteWithRegions(doc, "MailMergeWithRegionsDataTable.1.docx", dataTable);
Mail Merge Options
Mail Merge options allow you to customize the behavior of the mail merge process, controlling how data is processed, formatted, and displayed in the final document. These options provide flexibility for advanced scenarios and fine-tuning output.
Wordize supports the following MailMergeOptions:
- CleanupOptions – specifies what items should be removed during the mail merge
- CleanupParagraphsWithPunctuationMarks – indicate whether paragraphs with punctuation marks are considered as empty and should be removed if the RemoveEmptyParagraphs option is specified
- MergeDuplicateRegions – indicates whether all of the document mail merge regions with the name of a data source should be merged while executing mail merge with regions against the data source or just the first one
- MergeWholeDocument – indicates whether fields in a whole document are updated while executing mail merge with regions
- PreserveUnusedTags – indicates whether the unused tags should be preserved
- RegionEndTag – specifies a mail merge region end tag
- RegionStartTag – specifies a mail merge region start tag
- RestartListsAtEachSection – indicates whether lists are restarted at each section after executing the mail merge
- RetainFirstSectionStart – indicates whether the section start of the first document section and its copies for subsequent data source rows are retained during mail merge or updated according to MS Word behavior
- TrimWhitespaces – indicates whether trailing and leading whitespaces are trimmed from mail merge values
- UnconditionalMergeFieldsAndRegions – indicates whether merge fields and merge regions are merged regardless of the parent IF field’s condition
- UseNonMergeFields – when true, specifies that in addition to MERGEFIELD fields, mail merge is performed into some other types of fields and also into “{{fieldName}}” tags
- UseWholeParagraphAsRegion – indicates whether a whole paragraph with TableStart or TableEnd field or a particular range between TableStart and TableEnd fields should be included in the mail merge region
Use one of the templates above and the Execute or ExecuteWithRegions methods to perform a mail merge operation with the TrimWhitespaces option:
The following code example shows how to perform a mail merge operation with the TrimWhitespaces option using one of the templates above and Execute method:
var doc = "MergeTemplate.docx;

string[] fieldNames = new string[] { "FirstName", "Location", "Quantity" };
string[] fieldValues = new string[] { "James Bond", "London", "7" };

MailMergeOptions mailMergeOptions = new MailMergeOptions();
mailMergeOptions.TrimWhitespaces = true;

MailMerger.Execute(doc, "MailMerge.3.docx", SaveFormat.Docx, mailMergeOptions, fieldNames, fieldValues);
Mail Merge Clenup Option
Mail Merge cleanup options are used to control how the document is cleaned after the merge process. They help remove unused fields, empty paragraphs, and other leftover placeholders, ensuring clean output. These options are especially useful when some merge fields may not have corresponding data.
Wordize supports the following MailMergeCleanupOptions:
- None – to specify a default value
- RemoveEmptyParagraphs – to specify whether paragraphs containing mail merge fields with no data should be removed from the document
- RemoveUnusedRegions – to specify whether unused mail merge regions should be removed from the document
- RemoveUnusedFields – to specify whether unused merge fields should be removed from the document
- RemoveContainingFields – to specify whether fields that contain merge fields should be removed from the document if the nested merge fields are removed
- RemoveStaticFields – to specify whether static fields should be removed from the document
- RemoveEmptyTableRows – to specify whether empty rows containing mail merge regions should be removed from the document
- RemoveEmptyTables – to specify whether to remove from the document tables containing mail merge regions that were removed using either the RemoveUnusedRegions or the RemoveEmptyTableRows option
The following code example shows how to use MailMergeCleanupOptions:
var doc = "MergeTemplate.docx;

string[] fieldNames = new string[] { "FirstName", "Location", "Quantity" };
string[] fieldValues = new string[] { "James Bond", "London", "7" };

MailMergeOptions mailMergeOptions = new MailMergeOptions();
mailMergeOptions.MailMergeCleanupOptions = MailMergeCleanupOptions.RemoveEmptyParagraphs;

MailMerger.Execute(doc, "MailMerge.3.docx", SaveFormat.Docx, mailMergeOptions, fieldNames, fieldValues);
Mail Merge To an Image
You can also perform a mail merge operation and save the result as an image. To do this, you need to pass the output document format as ImageSaveOptions. In this case, each element of the returned array represents a single page of the output, rendered as an image.
The following code example shows how to perform a mail merge operation and specify the output document format using the ExecuteToImages method:
DataTable dataTable = new DataTable();
dataTable.Columns.Add("FirstName");
dataTable.Columns.Add("SecondName");

dataTable.Rows.Add("James", "Bond");
dataTable.Rows.Add("John", "Doe");

Stream[] pages = MailMerger.ExecuteToImages("MergeTemplate.docx", new ImageSaveOptions(SaveFormat.Png), dataTable);
See Also
FAQ
-
Q: How do I perform a simple mail merge with Wordize?
A: Create a template containing merge fields such as<<FirstName>>. Prepare parallel arrays (or a DataTable) with field names and values, then callMailMerger.Execute(templatePath, outputPath, fieldNames, fieldValues). The method generates a separate document for each record. -
Q: How can I merge a table of items using mail merge regions?
A: Define a region in the template with start/end tags, e.g.,<<TableStart:Items>>and<<TableEnd:Items>>. Supply aDataTableorDataSetthat contains the rows for the region and callMailMerger.ExecuteWithRegions(templatePath, outputPath, dataTable). The region will be repeated for every row in the data source. -
Q: My merged documents contain empty paragraphs where data is missing. How can I remove them?
A: Use the cleanup optionMailMergeCleanupOptions.RemoveEmptyParagraphs. Set it on aMailMergeOptionsinstance (mailMergeOptions.MailMergeCleanupOptions = MailMergeCleanupOptions.RemoveEmptyParagraphs;) and pass the options toMailMerger.ExecuteorExecuteWithRegions. Empty paragraphs will be stripped from the final document. -
Q: Can I generate images directly from a mail merge operation?
A: Yes. CallMailMerger.ExecuteToImagesand provide anImageSaveOptionsobject specifying the image format (e.g., PNG). The method returns an array of streams, each representing a page rendered as an image. -
Q: How do I change the default start and end tags for mail merge regions?
A: Create aMailMergeOptionsobject and setRegionStartTagandRegionEndTagto the desired strings (e.g.,mailMergeOptions.RegionStartTag = "MyStart";). Pass this options instance to the merge method, and Wordize will recognize the custom tags in the template.